

A failing diaphragm causes air leaks, pressure drops, and unplanned downtime. Replacing it with an ASCO diaphragm repair kit restores performance—but how do you make that repair last? This guide reveals seven actionable maintenance strategies to maximize the service life of your kit, reduce replacement frequency, and save thousands in operational costs.
You will learn how to identify early warning signs, optimize air quality, and perform correct installation techniques. Whether you maintain dust collectors, conveyors, or process valves, these tips will help you get the most from every repair kit.

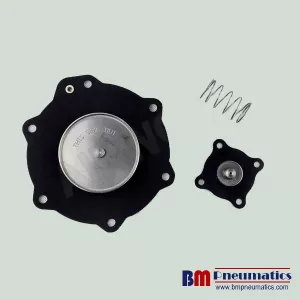
[Image: A close-up of an ASCO diaphragm repair kit laid out on a clean workbench, showing the diaphragm, spring, and sealing components. Alt text: Components of an ASCO diaphragm repair kit for pulse jet valves]
1. Start with a Clean, Dry Air Supply
Compressed air quality is the number one factor affecting diaphragm life. Moisture, oil aerosols, and solid particles attack the rubber compound.
- Install proper filtration: Use a coalescing filter (5-micron or better) upstream of your valve manifold.
- Dry the air: Ensure your air dryer maintains a pressure dew point at least 10°C below the ambient temperature.
- Drain regularly: Automatic drains on receivers and filter bowls prevent liquid from reaching the diaphragm.
Clean air prevents swelling, hardening, or premature cracking of the sealing lip.
2. Match Your Kit to the Environment
Not all ASCO repair kits are identical. Standard diaphragms use NBR (nitrile) for general-purpose air. But harsh conditions require upgraded materials.
- High temperatures (above 80°C / 176°F): Choose a kit with FKM (Viton) diaphragms. They resist heat degradation far longer than NBR.
- Aggressive chemicals or ozone: Use EPDM or FKM. Avoid NBR in the presence of solvents or UV exposure.
- Low temperatures (below -20°C / -4°F): Special low-temperature NBR or silicone compounds maintain flexibility.
Selecting the right material from the start can double or triple the lifespan of your ASCO diaphragm repair kit.
3. Inspect the Valve Body Before Installation
A worn valve body destroys new diaphragms quickly. Scratches, pitting, or sharp edges on the sealing surface will cut into the rubber.
- Run a finger along the seat: Feel for nicks or burrs. Lightly polish minor imperfections with fine-grit (600+) emery cloth.
- Check the pilot port: Ensure the small orifice is clear of debris. A blocked pilot can cause slow closure, slamming the diaphragm.
- Replace worn bodies: If the valve body shows deep corrosion or erosion, install a new valve assembly—not just the repair kit.
4. Install Correctly Without Over-Torquing
Installation errors cause up to 30% of premature diaphragm failures. The most common mistake is over-tightening the bonnet screws.
- Follow torque specifications: For most 1” and 2” ASCO pulse valves, the recommended torque is 4–6 Nm (35–50 in-lbs). Use a calibrated torque wrench.
- Use a crisscross pattern: Tighten screws gradually and in sequence to compress the diaphragm evenly.
- Align the center hole: Ensure the diaphragm’s center hole seats perfectly over the valve’s guide post. Misalignment leads to uneven wear.
[Image: A torque wrench being used to tighten the bonnet screws of an ASCO pulse valve in a crisscross pattern. Alt text: Correct installation of ASCO diaphragm repair kit using a torque wrench]
5. Set the Right Pulse Timing
Aggressive pulse timing kills diaphragms. Short, frequent pulses cause the diaphragm to snap open and shut rapidly, accelerating fatigue.
- Pulse-on time: Keep it between 50 and 150 milliseconds. Longer pulses waste air and stress the diaphragm.
- Pulse-off time: Allow at least 3–5 seconds between pulses. This lets the diaphragm rest and the valve body re-pressurize.
- Match to dust load: In light dust applications, you can increase off-time further without harming cleaning efficiency.
Adjust your timer or PLC settings to the gentlest schedule that still maintains pressure drop.
6. Perform Regular Monthly Audits
Proactive inspections catch small issues before they destroy the diaphragm. Add these checks to your monthly PM routine.
| Check Point | What to Look For | Action |
|---|---|---|
| Air leaks | Hissing from the vent port | Replace diaphragm immediately |
| Slow closing | Valve stays open >2 seconds after pulse | Check spring and pilot seal |
| Unusual noise | Hammering or buzzing | Inspect for loose bonnet or debris |
| Temperature | Body feels excessively hot | Upgrade to Viton kit |
Log each finding. Tracking failure patterns helps you predict when your ASCO diaphragm repair kit needs replacement before unplanned downtime occurs.
7. Store Spare Kits the Right Way
Even unused repair kits age if stored improperly. Rubber components cure, harden, or take a permanent set.
- Cool and dark: Store at 10°C to 25°C (50°F to 77°F). Avoid direct sunlight and UV light.
- Low humidity: Keep relative humidity below 65%. Use silica gel packs in storage bins if needed.
- Original packaging: Keep kits sealed in their factory bags until use. The packaging controls oxygen exposure.
- Shelf life: Use NBR kits within 24 months of manufacture, FKM within 36 months. Date your stock with a marker.
[Image: Spare ASCO diaphragm repair kits stored in labeled plastic bins in a clean, organized maintenance storeroom. Alt text: Proper storage of ASCO diaphragm repair kit spare parts]
Conclusion: Small Changes Deliver Big Gains
Extending the life of your ASCO diaphragm repair kit comes down to clean air, correct material selection, gentle installation, and smart timing. By following these seven steps, you can typically double the service interval—from one year to two or more. That means fewer replacements, lower maintenance costs, and less unplanned downtime.
Ready to optimize your valve maintenance? Download our free ASCO Pulse Valve Troubleshooting Guide for a visual checklist and torque reference card. Or browse our full range of genuine and compatible repair kits for next-day shipping.