
Installing a pulse valve seems straightforward—until an air leak drains your system efficiency or a burnt-out coil shuts down production. The ASCO SCG353A047 valve is a robust component, but it is surprisingly sensitive to installation errors. Whether you are replacing an old unit or setting up a new dust collector, avoiding common pitfalls is the difference between a “set it and forget it” installation and a costly headache. Here are the five most frequent mistakes we see and exactly how to avoid them.
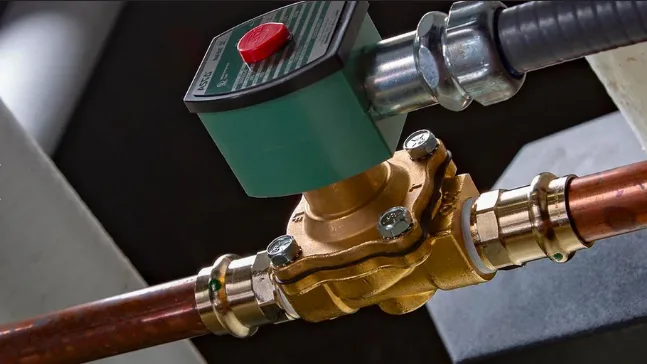
Mistake #1: Incorrect Solenoid Orientation
One of the most frequent errors is mounting the valve with the solenoid coil in the wrong position. It might fit, but it will fail prematurely.
The “Almost Vertical” Rule
The coil on your ASCO SCG353A047 valve must be installed with the coil housing pointing vertically upward . While some sources allow a slight tilt (up to 1°), it should generally be oriented vertically . Installing it horizontally or upside down can cause the internal plunger to misalign due to gravity, leading to sluggish operation or failure to actuate.
Why It Matters
Incorrect orientation prevents condensate from draining away from the coil. Over time, moisture seeps into the electrical housing, causing corrosion and short circuits. Always ensure the conduit hub is pointing down or to the side to prevent water from traveling along the wires and into the coil .
Mistake #2: Applying the Wrong Voltage
It is a simple check that is often overlooked in the rush to get a system back online.
Check the Coil Stamp
The ASCO SCG353A047 valve is available in various voltages (e.g., 24V DC, 24V AC, 120V AC, 240V AC) . Applying 120V to a 24V coil will destroy it almost instantly—often with visible smoke or melting.
Polarity Matters for DC
If you are working with a DC voltage model and the coil has a built-in LED indicator light (common in DIN connectors), polarity is critical. If the wires are reversed, the valve might still work, but the indicator light will not illuminate, making future troubleshooting difficult . Double-check your wiring against the coil’s datasheet before powering up.
Mistake #3: Ignoring System Purging and Cleanliness
Industrial piping is dirty. New pipes contain welding slag, Teflon tape fragments, and rust. If you install a new valve without cleaning the lines, you are inviting debris directly into the mechanism.
Contamination is a Killer
Dirt is a leading cause of valve failure. Debris can block the small pilot orifice, preventing the valve from opening, or it can get lodged between the diaphragm and the valve seat, causing the valve to leak air constantly .
The Fix
Before connecting your new ASCO SCG353A047 valve, purge the air manifold with compressed air (at least 0.3 MPa) to blow out any contaminants . If your system is prone to debris, ensure a filter with 5μm or better filtration is installed upstream of the valve .
Mistake #4: Improper Thread Sealing
Watching someone install a valve is often where you spot the pros versus the amateurs. Sealing threads is an art.
The Teflon Tape Trap
When using PTFE tape on the ASCO SCG353A047 valve‘s NPT threads, you must wrap it in the correct direction. Looking at the end of the pipe, wrap the tape clockwise . If you wrap it counter-clockwise, the tape will unravel and bunch up as you screw the valve in. Those bunched-up shreds then break off and travel into the valve, causing the contamination issues mentioned in Mistake #3.
Tightening Torque
Do not use the valve body as a lever. Over-tightening can crack the aluminum body of the SCG353A047 . Tighten until snug, then add no more than one full turn. Also, apply sealant only to the male pipe threads—never put sealant inside the female port of the valve.
Mistake #5: Skipping the Manual Operator Test
After installation, there is a strong temptation to turn the air on and hit the main power immediately.
Test Before Pressurizing
The ASCO SCG353A047 valve is equipped with a manual operator (usually a small button or screw on the solenoid). Before restoring air pressure, press this manual operator . You should feel a distinct click and the internal mechanism should move freely. If it feels stuck or gritty, something is wrong internally.
The Soapy Water Finale
Once the air is on, do not just listen for leaks—look for them. Mix a solution of soapy water and spray it on the pipe threads and the joint between the valve body and the manifold. If you see bubbles forming, you have a leak that needs immediate attention .
Conclusion: Get It Right the First Time
Installing an ASCO SCG353A047 valve correctly is mostly about avoiding these five traps: orienting the coil vertically, matching the voltage, cleaning the pipes, sealing the threads properly, and testing manually. By taking these precautions, you ensure maximum valve life and optimal performance for your dust collection system.
For a visual walkthrough of the installation process or to browse genuine replacement parts and repair kits, check out our video tutorial series below.